Build the layers you cannot see, so your bathroom stays dry and beautiful for years.
With a few early choices, your bathroom runs smoother from demo to finish. Focus on the layers behind the tile, choose the right wall board, and build a continuous waterproof system that keeps water out of your home, not just off the surface.
TL;DR:
- Pick backer boards made for true wet areas, not just “moisture resistant” drywall.
- Use a bonded waterproof membrane so walls and floor form one watertight system.
- Slope the shower floor toward the drain, then flood-test the pan before tile.
- Protect corners, seams, and penetrations so the system stays sealed.
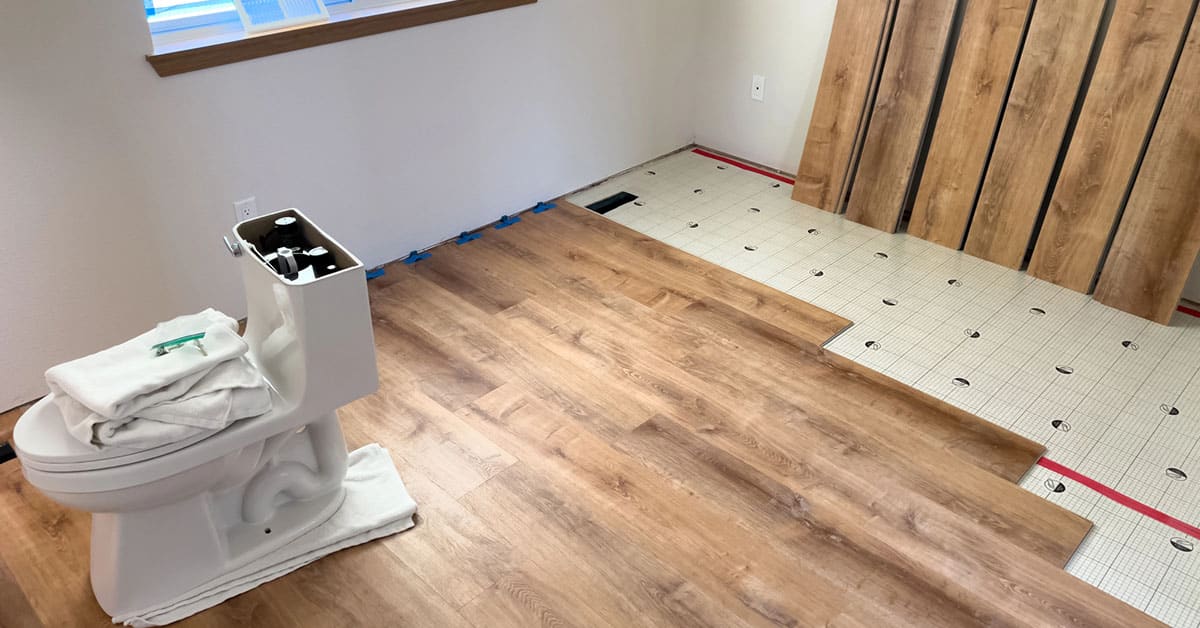
Use the right backer in wet zones
Not all wall boards belong in a shower. “Water-resistant” drywall can survive a damp room, but direct spray is another story. In true wet areas, use cement board, fiber-cement, or approved foam panels that are designed for constant moisture. They hold fasteners well, resist swelling, and give the waterproof layer a solid, flat base.
Plan the board layout before you start fastening. Keep seams away from heavy splash zones when possible, and follow the manufacturer’s pattern for screws so the surface stays flat. When the walls are open, add solid blocking where you know you will mount a seat, grab bar, or glass. That way, hardware can be anchored without punching extra holes later.
Cut edges deserve the same care as factory edges. Keep cuts clean and square so the waterproofing can bridge seams smoothly. If niches or benches are part of the plan, frame them now and make sure the backer board transitions are tight and supported.
[Pro Note]
Backer boards are part of the system. Match the board, fasteners, and seam treatment to the waterproofing you will use so everything bonds properly and stays flat.
Build a continuous waterproof assembly
Tile and grout are finishes. The waterproofing happens in the layer directly under them. According o the Virginia Residential Code, you may use a bonded waterproof membrane (a thin sheet or liquid layer) across shower walls and floors so water never reaches the framing. This creates one continuous shield that ties the whole wet area together.
The shower floor must also pitch to the drain. A steady, gentle slope moves water where it should go and prevents pooling at corners or along the curb. Slope is not just a tile skill, it is a requirement that supports the waterproofing underneath, according to the International Code Council.
Before any tile goes down, flood-test the shower pan. That means holding water in the receptor long enough to prove there are no leaks. Catching a pinhole now is quick; finding it after grout cures is costly. A flood test is a standard step inspectors recognize for proving watertightness, according to the International Code Council.
[Safety Tip]
Keep fasteners out of the critical waterproof zone near the pan and curb. One misplaced screw can defeat the system.
Protect corners, seams, and penetrations
Water finds the weakest spot, so details matter. At inside corners, use pre-formed membrane corners or reinforce liquid membranes with fabric. Wrap niches and benches so the waterproofing turns every edge, not just the front face. At valves, shower heads, and accessories, use approved seals or gaskets so the membrane stays intact around each hole.
Plan for glass hardware and grab bars before tile. With solid blocking already in place, you can hit wood, use the right anchors, and avoid over-drilling. Where the shower floor meets walls or the curb, leave space for a flexible sealant so those changes of plane can move without cracking the finish. This small gap helps the finish layer ride on top of the waterproof system without stress.
Finally, check the surface for flatness. A flat, true surface lets tile bond evenly and keeps the membrane from bridging big dips or humps. Wipe dust, vacuum the corners, and fix any ridges before tile goes in. Clean prep helps the membrane and tile work as one.
[Myth vs Fact]
Myth: Tile and grout make the shower waterproof. Fact: The layer under the tile keeps water out of your walls and floor. Tile is the finish you see.
Frequently asked questions
Is tile waterproof by itself?
No. Tile and grout are finish materials. The waterproofing is a thin layer under the tile that stops water before it reaches the framing. When the membrane covers walls and floor as one system, your shower can handle daily use without hidden moisture.
Do I really need to flood-test the shower pan?
Yes. A flood test confirms the pan and drain connection are watertight before tile covers them. It is a simple, high-value step that prevents costly tear-outs later. Pros and inspectors recognize it as a standard quality check on any new shower.
Can I use “green board” in a shower?
“Green board,” or moisture-resistant drywall, is not made for constant spray. In true wet areas, use cement board, fiber-cement, or approved foam panels. These products handle fasteners and steam, and they support the waterproof membrane without swelling.
How should I handle corners and niches?
Treat corners and niche edges like mini roofs. Use pre-formed corners or fabric reinforcement so the membrane turns every edge. Seal around valves and accessories with approved gaskets. These small details keep the system continuous and leak-resistant.
What to do next
Choose a wet-area backer board, then pick a waterproofing system and stick with it from floor to ceiling. Confirm the shower floor pitch, schedule a flood test, and protect corners, seams, and penetrations. When you are ready, we will walk your space and build a waterproof plan that lasts.
Sources
- Virginia Residential Code — Chapter 27 Plumbing Fixtures — https://assets.schluter.com/asset/570120892212/document_t6qeu5krrh1itd5nlcelbtu159/Product%20Spec%20Guide%202019.pdf — 2025-09-08
- International Code Council (ICC) — Chapter 27: Plumbing Fixtures (shower floor slope) — https://codes.iccsafe.org/content/IRC2021P3/chapter-27-plumbing-fixtures — 2025-09-08
- International Code Council (ICC) — P2503.6 Shower Liner Test (flood test) — https://codes.iccsafe.org/content/IRC2021P3/chapter-25-plumbing-administration#IRC2021P3_Pt07_Ch25_SecP2503.6 — 2025-09-08